Roof flashing, often made of materials like metal or rubber, serves as a protective barrier against water intrusion in vulnerable areas of a roof. It’s strategically installed around chimneys, vents, skylights, and roof valleys to prevent leaks. Maintaining intact and properly installed roof flashing is crucial for safeguarding your home against water damage. Leaking or damaged flashing can lead to costly repairs and structural issues if left unattended. In this article, we’ll delve into the intricacies of repairing roof flashing, offering insights on identifying issues, step-by-step repair processes, common mistakes to avoid, and tips for effective maintenance. Let’s explore how to ensure your roof flashing remains in optimal condition to protect your home.
Table of Contents
- Understanding Roof Flashing
- Signs of Damaged Roof Flashing
- Tools and Materials Required
- How to Repair Roof Flashing?
- DIY vs. Professional Help
- Maintenance Tips for Roof Flashing
- Recap: Shielding Roofs with Flashing
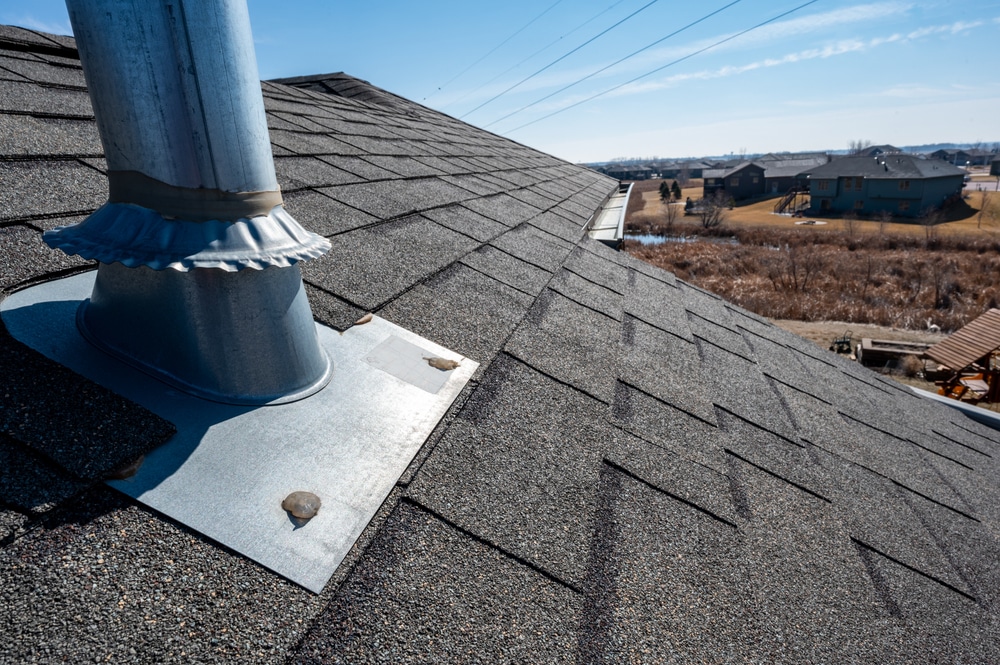
Understanding Roof Flashing
Roof flashing serves as a protective barrier, directing water away from critical areas such as intersections, valleys, chimneys, vents, and skylights. Its primary purpose is to seal these susceptible joints and angles, safeguarding against leaks and water ingress during heavy rain, snow, or other weather conditions.
Types of Roof Flashing Materials
- Metal Flashing: Widely used and reliable, materials like aluminum, copper, and galvanized steel offer durability and resilience against extreme weather conditions. They are corrosion-resistant and often preferred for their long-lasting performance.
- Rubber Flashing (EPDM): This flexible synthetic rubber, particularly EPDM, excels in conforming to irregular shapes and curves on roofs. Its elasticity and weather-resistant nature make it an excellent choice for challenging roof designs.
- Plastic Flashing: Materials like PVC (polyvinyl chloride) or other thermoplastics are lightweight and cost-effective. They are suitable for less demanding areas and can be shaped easily to fit specific roofing profiles.
- Composite Flashing: Blends of materials like rubber and plastic or other synthetic compounds offer a mix of desirable qualities. These composites can combine flexibility, weather resistance, and durability, making them versatile for various roofing applications.
- Bituminous Flashing: Comprising materials like modified bitumen or asphalt, these options offer waterproofing capabilities. They are often used in conjunction with other materials to provide added protection against water infiltration.
- Cementitious Flashing: Cement-based flashing materials provide excellent durability and fire resistance. They are commonly used in high-temperature zones or where fire safety is a primary concern.
Signs of Damaged Roof Flashing
Identifying signs of damaged roof flashing is crucial in maintaining the integrity of your roof and preventing potential leaks and structural issues. The flashing, typically made of metal, serves as a protective barrier around vulnerable areas, such as vents, chimneys, and edges, safeguarding against water infiltration. However, various factors can compromise its effectiveness, leading to visible indications of damage. Recognizing these signs, from corrosion and missing sections to deteriorating sealant, is essential for timely intervention and maintenance to uphold the roof’s durability and prevent potential water damage within your home.

- Visible Corrosion or Rust: Metal flashing, particularly if made of materials like steel or iron, might exhibit signs of corrosion or rust. This can weaken the flashing, making it susceptible to leaks and requiring immediate attention to prevent further deterioration.
- Loose or Missing Sections: Over time, flashing may become loose or sections might go missing due to exposure to weather elements or inadequate installation. These gaps create pathways for water to infiltrate the roof, causing damage to the underlying structure.
- Cracked or Peeling Sealant: Sealant applied around the flashing can degrade due to prolonged exposure to the elements. Cracking, peeling, or dried-out sealant indicates compromised waterproofing, necessitating resealing or replacement to maintain the integrity of the flashing.
- Water Stains on Ceilings or Walls: Internal signs of damaged flashing often manifest as water stains on ceilings or walls, indicating that water has penetrated through the roof. These stains usually appear after rainfall and serve as visible indicators of leaks caused by faulty flashing.
Tools and Materials Required
Embarking on a roof flashing repair project necessitates a comprehensive array of tools and materials, each playing a vital role in restoring the integrity of the flashing and fortifying the roof against potential leaks.
Essential Tools for Repairing Roof Flashing
- Caulk Gun: An indispensable tool for dispensing sealant or caulk with precision, ensuring a tight and waterproof seal around the repaired area.
- Putty Knife: Its versatility in scraping off old sealant and removing debris from the flashing surface is invaluable, aiding in preparing the surface for repairs.
- Wire Brush: This tool serves to thoroughly clean and abrade the area, facilitating better adhesion of new sealant or adhesive to the flashing.
- Tin Snips or Metal Shears: Essential for cutting and shaping metal flashing materials with precision, allowing for seamless integration and repairs.
- Safety Gear: Prioritizing safety is imperative. Gloves, safety glasses, and, if working at heights, proper safety harnesses or equipment are indispensable for personal protection.
Materials Required Tailored to Different Roof Flashing Types
- Metal Flashing: Repairs involving metal flashing demand replacement metal sheets or strips compatible with the existing material. Sealants designed explicitly for use with metal flashing, such as roofing cement or silicone-based products, are crucial to ensure a secure and enduring fix.
- Rubber Flashing (EPDM): For rubber or EPDM flashing repairs, procuring EPDM patch kits or sheets, a compatible adhesive or sealant, and specialized primer formulated explicitly for EPDM surfaces becomes essential for a reliable and enduring repair.
- Other Materials: Diverse roofing materials (plastic, composite, etc.) might necessitate specific repair kits or materials tailored for those unique types of flashing.
The meticulous selection of tools and materials is pivotal in executing a successful repair job. The synergy between quality tools and compatible materials tailored to the specific type of flashing not only ensures an effective repair but also bolsters the overall longevity and resilience of the roof flashing. By investing in quality tools and appropriate materials, homeowners can secure a durable and watertight repair, reinforcing the structural integrity of their roofing system.
How to Repair Roof Flashing?
Repairing roof flashing is crucial for maintaining a weatherproof and sturdy roof. It involves a systematic approach to ensure a strong and lasting fix. The following step-by-step guide will walk you through the process of repairing roof flashing, ensuring your roof remains resilient against the elements.

1. Assessment: Inspecting the Damaged Area
Begin by thoroughly examining the affected area of the roof flashing. Identify any signs of damage, such as corrosion, loose sections, or compromised sealant. Assess the extent of the damage to determine the necessary repair steps.
2. Cleaning: Removing Debris and Old Sealant
Prepare the surface by cleaning it thoroughly. Use a putty knife to scrape off debris, old sealant, or any accumulated dirt. A wire brush can help in effectively cleaning and prepping the surface for repair.
3. Preparation: Preparing the Surface for Repair
After cleaning, ensure the surface is dry and free from any residue. This step is crucial for optimal adhesion of the new materials. Use a solvent or cleaner as needed to remove any remaining traces of old sealant.
4. Application: Applying New Flashing Material or Sealant
If the damage requires replacing sections of flashing, carefully cut and shape the new flashing material to fit the area. Apply an appropriate sealant or adhesive according to the type of material used, ensuring it’s firmly secured in place.
5. Sealing: Properly Sealing the Repaired Area
Seal all edges and seams meticulously to prevent water infiltration. Use a caulking gun to apply a uniform bead of sealant along the repaired flashing. Ensure complete coverage to create a watertight seal.
6. Inspection: Checking the Repair for Effectiveness
Allow the repair to set and dry according to the manufacturer’s instructions. Once dried, inspect the repaired area thoroughly. Check for any gaps, uneven seals, or signs of imperfections. Perform a water test by gently spraying the repaired section with water to ensure it is leak-proof.
Adhering to these steps meticulously is crucial for a successful roof flashing repair. Each step plays a vital role in the overall effectiveness and longevity of the repair. Regular maintenance and timely repairs contribute significantly to preserving the integrity of the roofing system and preventing potential water damage.
DIY vs. Professional Help
When faced with roof flashing repairs, homeowners often contemplate between undertaking the task themselves or seeking professional assistance. Understanding the advantages and limitations of both approaches is crucial in making an informed decision.
DIY Roof Flashing Repair
Opting for a do-it-yourself (DIY) approach offers certain benefits, particularly for individuals adept at basic home repairs. DIY enthusiasts with adequate experience in handling tools and minor roof repairs might find this option cost-effective and empowering. Moreover, small, manageable repairs can be swiftly addressed without the need to schedule appointments or incur additional expenses.
However, DIY roof flashing repair requires a certain level of expertise and caution. Incorrectly executed repairs might exacerbate the problem, leading to more extensive damage and higher repair costs down the line. Additionally, working on rooftops poses inherent risks, necessitating proper safety measures and equipment to prevent accidents.
Professional Roof Flashing Repair
Engaging professional roofing services for flashing repairs brings the expertise and assurance of skilled professionals. Roofing experts possess the requisite knowledge, experience, and specialized tools to execute repairs effectively and efficiently. They can accurately diagnose issues, provide comprehensive solutions, and ensure quality workmanship that adheres to industry standards. Furthermore, professional roofers carry insurance and warranties, providing homeowners with added peace of mind. Their work is often backed by guarantees, offering protection in case of any issues arising after the repair.
However, professional services typically come at a cost higher than DIY repairs. This expense accounts for the labor, expertise, and warranty coverage provided. Scheduling appointments and waiting for service availability might also extend the repair timeline, particularly for non-urgent repairs.
Deciding between DIY and professional help hinges on factors such as the complexity of the repair, individual skill level, safety considerations, and the urgency of the issue. While DIY repairs might suit minor, manageable damages, complex or extensive repairs are best left to experienced professionals. Prioritizing safety, expertise, and the long-term integrity of the roof flashing is paramount in making this decision.
Maintenance Tips for Roof Flashing
Maintaining the integrity of roof flashing is paramount in ensuring a leak-free and durable roofing system. Implementing preventive measures and adhering to a consistent maintenance schedule can significantly prolong the lifespan of the flashing and safeguard against potential water damage.

- Regular Inspections: Conduct routine visual inspections of the roof flashing at least twice a year, preferably during spring and fall. Look for signs of damage, corrosion, loose sections, or worn sealant. Addressing minor issues promptly prevents them from escalating into more significant problems.
- Clear Debris: Keep the roof and flashing free from debris such as leaves, branches, and dirt. Accumulated debris can impede water flow and contribute to deterioration of the flashing. Regularly remove debris to maintain proper drainage and prevent potential blockages.
- Sealant Checks and Reapplication: Inspect the condition of sealants around the flashing. Replace or reapply sealants as needed, especially if signs of cracking, peeling, or degradation are observed. Properly sealed flashing ensures a watertight barrier against leaks.
- Trim Overhanging Branches: Trim any overhanging branches near the roofline to prevent abrasion or damage to the flashing. Branches rubbing against the flashing can wear away protective coatings and lead to vulnerabilities.
- Professional Inspection: Consider scheduling periodic professional inspections by roofing experts. Their trained eye can detect issues that might go unnoticed during routine inspections. Professional assessments help in early detection of potential problems, allowing for timely repairs.
Recommended Maintenance Schedule
To ensure the longevity and effectiveness of your roof flashing, it’s crucial to adhere to a recommended maintenance schedule. Regular inspections and upkeep are essential in safeguarding your roof against potential damage and ensuring proper water drainage. By adhering to these practices, you can proactively preserve the integrity of your roof flashing and extend the lifespan of your roof.
- Biannual Inspections: Perform detailed inspections of the roof flashing twice a year, ideally in spring and fall. Check for damage, sealant integrity, and any signs of wear or deterioration.
- Seasonal Cleanings: Remove debris and clear gutters regularly, especially after storms or heavy winds. Cleanliness around the flashing promotes proper water drainage and prevents blockages that could compromise the flashing’s effectiveness.
- Sealant Reapplication: Monitor the condition of sealants annually. Consider reapplying or touching up sealants around the flashing every few years, or as recommended by the manufacturer, to maintain their effectiveness.
- Professional Maintenance: Schedule professional roof inspections and maintenance every few years, depending on the age and condition of the roof. Professionals can conduct comprehensive assessments and address any underlying issues, ensuring the longevity of the flashing and the roof.
Recap: Shielding Roofs with Flashing
The significance of well-maintained roof flashing cannot be overstated. Acting as a protective barrier, it shields vulnerable areas of the roof from water penetration. By redirecting water away from intersections, valleys, chimneys, and other potential leak points, properly maintained flashing ensures a watertight seal that prevents damage to the interior spaces and structural components of a building.
As homeowners or property managers, prioritizing the upkeep of roof flashing serves as a prudent investment in the overall durability and resilience of the roofing system. Through regular inspection, meticulous maintenance, and timely repairs, one can fortify the roofing structure, ensuring its steadfastness against the elements for years to come.