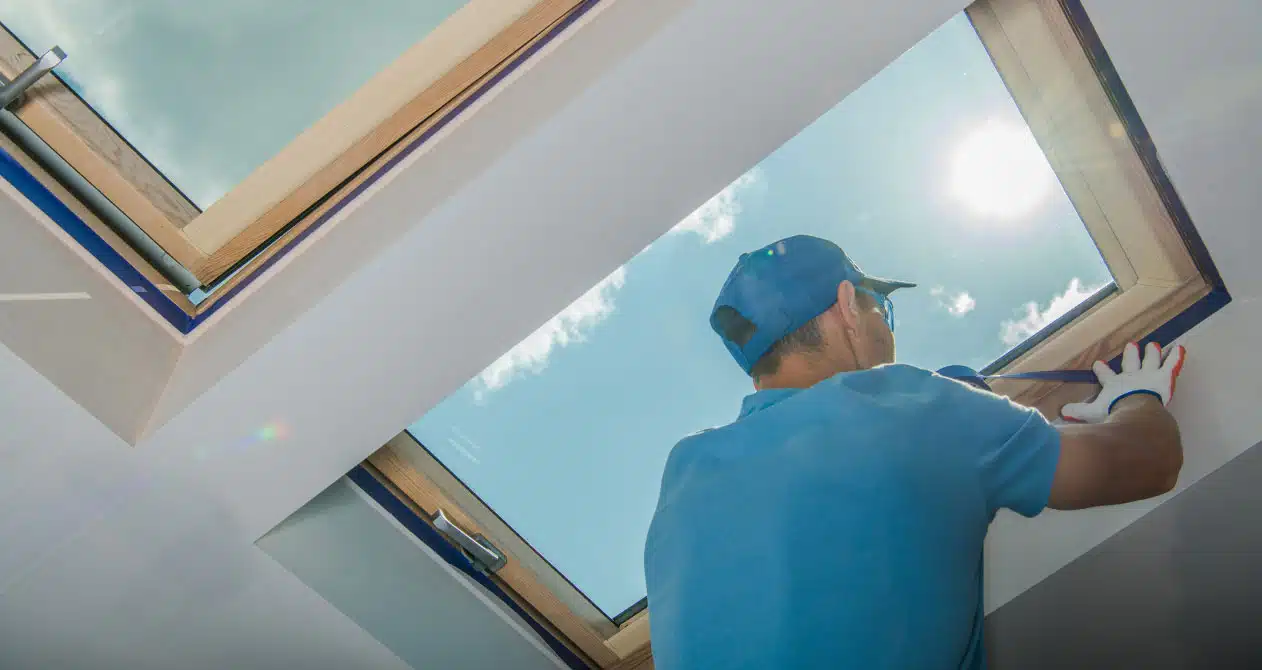
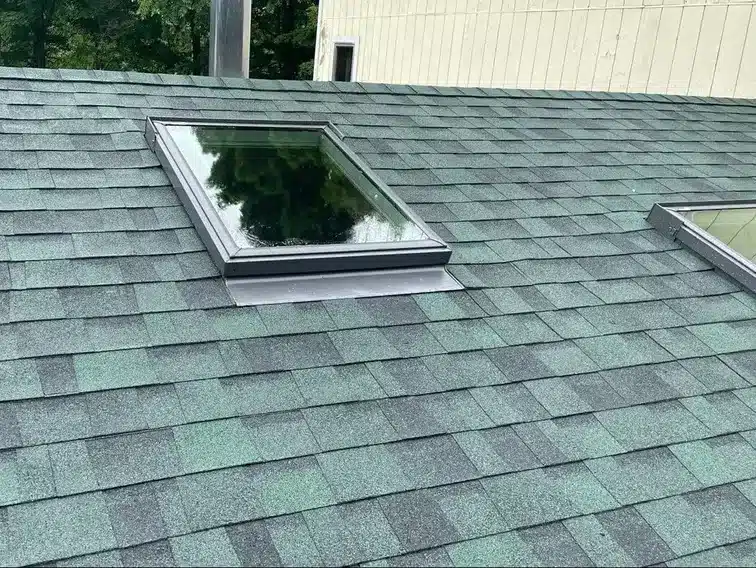
Call us now for our roofing services!

    857-415 7727

What to Know About Skylight Replacement?

Skylights play a crucial role in enhancing the aesthetic appeal and functionality of a building. They allow natural light to flood indoor spaces, creating a warm and inviting atmosphere. Over time, however, skylights may deteriorate due to wear and tear, weather damage, or simply aging.  In this article, we will explore the essential aspects of skylight replacement and provide valuable insights for homeowners and building owners. Let’s delve into the key points to understand about skylight replacement.

Table of Contents

  1. Understanding Skylight Replacement
  2. How to Replace Skylight: Step-by-Step Guide
  3. 24 x 24 Skylight Dome Replacement
  4. 2×2 Skylight Replacement: Step-by-Step Guide
  5. 4×4 Skylight Replacement
Modern skylight on the roof

Understanding Skylight Replacement

Why Do Skylights Need Replacement?

Skylights endure constant exposure to the elements, including rain, harsh UV rays, and temperature fluctuations. Consequently, the long-term effects of such exposure contribute to wear and tear on skylights, necessitating their replacement. There are several common reasons why skylights require replacement, including the following:

Damage: Skylights are highly susceptible to damage caused by severe weather conditions such as storms, hail, or strong winds. In addition, falling debris or accidental impacts can result in cracks or breakage, rendering the skylight ineffective and potentially compromising the safety and security of the structure.

Leaks and Moisture: As skylights age, they may develop cracks, gaps, or compromised seals, leading to water leaks and moisture penetration. These issues can manifest as water stains, dripping, or even significant structural damage if left unaddressed. Moreover, the presence of moisture can foster the growth of mold or mildew, posing health risks to occupants and further deteriorating the skylight.

Energy Efficiency: Older skylights often lack adequate insulation and advanced glazing technology, leading to energy loss. The inefficient transfer of heat and cold air through the skylight can significantly impact a building’s energy efficiency and result in higher utility bills. By replacing outdated skylights with energy-efficient alternatives, building owners can enhance insulation, reduce heat transfer, and improve overall energy efficiency.

Signs of a Failing Skylight

To ensure the safety and effectiveness of a skylight, it is essential to be able to identify the signs indicating that it may be failing. By recognizing these indicators, homeowners can take appropriate action, such as repairing or replacing the skylight, to prevent further damage. Here are the key signs to look out for:

Water Leaks: One of the most obvious signs of a failing skylight is the presence of water leaks. If you notice noticeable water stains or witness drips around the skylight, it is a clear indication that water is penetrating the skylight’s seal or flashing. These leaks can lead to significant water damage within the surrounding area, including the ceiling and walls. Moreover, prolonged exposure to moisture can promote the growth of mold and mildew, posing health risks and potentially requiring expensive remediation.

Condensation: Excessive condensation accumulating inside the skylight is another sign that something may be wrong. While some condensation is normal under certain conditions, an excessive amount suggests a potential issue with the skylight’s seal or insulation. It indicates that moisture is seeping into the skylight and may cause further damage if not addressed promptly. This can lead to not only water damage but also compromise the energy efficiency of the skylight, resulting in higher utility bills.

Cracks or Breakage: Visible cracks or shattered glass on the skylight demand immediate attention and replacement. These damages can occur due to various reasons, such as hail, falling debris, or natural wear and tear. Regardless of the cause, cracked or broken skylights compromise their structural integrity and pose safety hazards. They are more susceptible to water leaks, increased heat transfer, and even potential collapses. Therefore, it is crucial to address these issues promptly to ensure the safety of the occupants and prevent further damage to the skylight and surrounding areas.

Drafts and Energy Loss: A failing skylight may allow drafts and result in a noticeable change in temperature near the skylight. This is often a result of inadequate insulation or seal failure. The presence of drafts can make the living space uncomfortable, especially during extreme weather conditions. Additionally, the loss of heat or cool air through the skylight can significantly impact the energy efficiency of the home, leading to increased energy consumption and higher utility bills.

By being vigilant and observing these signs, homeowners can proactively detect skylight problems and take appropriate measures to address them. It is recommended to consult a professional skylight contractor or installer who can assess the situation accurately and provide guidance on whether repair or replacement is necessary. Regular maintenance and timely repairs or replacements will help ensure the longevity, functionality, and safety of skylights in residential and commercial buildings.

How to Replace Skylight: Step-by-Step Guide

  1. Assessing the Skylight Size. Before embarking on a skylight replacement project, it is crucial to assess the size of the existing skylight. Start by measuring the length and width of the skylight from the inside of the frame. This measurement will help determine the appropriate size for the replacement skylight, enabling you to find a suitable match.
  2. Removing the Old Skylight. To begin the skylight replacement process, the first step is to remove the old skylight. Start by carefully removing any trim or molding around the skylight. Next, detach the screws or nails that hold the skylight frame in place. In case there is caulking or adhesive present, a putty knife can be used to loosen and remove it. Lift the old skylight slowly and remove it from the opening.
  3. Preparing the Opening. Once the old skylight is removed, it’s time to prepare the opening for the installation of the new skylight. Thoroughly inspect the opening for any signs of damage or rot. If any parts of the wood or insulation are damaged, it is essential to repair or replace them as necessary. Ensure that the opening is clean and free from any debris. If the opening is larger than the replacement skylight, appropriate materials such as wood or insulation should be used to reduce the size and create a snug fit.
  4. Installing the New Skylight. Carefully position the new skylight into the prepared opening. Make sure it is centered and level. Follow the manufacturer’s instructions for securing the skylight in place, which typically involves using screws or nails. Additionally, apply a bead of waterproof sealant around the perimeter of the skylight to create a watertight seal, preventing any potential leaks.
  1. Ensuring Proper Sealing and Insulation. Once the new skylight is installed, it is essential to ensure that it is properly sealed and insulated. Inspect the skylight installation for any gaps or areas that require additional sealing. Apply weatherproofing tape or sealant to any vulnerable areas, such as the joints between the skylight frame and the roof. Additionally, check the insulation around the skylight and add more if necessary to improve energy efficiency and prevent drafts.

By following these step-by-step instructions, you can successfully replace a skylight and enjoy the benefits of a new, well-sealed, and properly installed skylight in your home or building.

24 x 24 Skylight Dome Replacement

A 24 x 24 skylight dome refers to a dome-shaped cover that is specifically designed to fit over a skylight opening with dimensions of 24 x 24 inches. This dome is constructed using durable materials such as acrylic or polycarbonate, which serve the dual purpose of allowing natural light to enter the space while safeguarding against external elements.

There are several circumstances that may necessitate the replacement of a 24 x 24 skylight dome. One common reason is damage caused by hail, severe weather conditions, or simply the natural aging process. Cracks, discoloration, or leaks may develop over time, compromising the functionality and aesthetic appeal of the skylight, thereby requiring a replacement.

Step-by-Step Guide to 24 x 24 Skylight Dome Replacement:

  1. Removing the Old Dome. To begin the replacement process, start by carefully removing any trim or molding surrounding the skylight dome. Depending on the specific attachment mechanism, you might need to unscrew or release clips and fasteners holding the dome in place. Once these are removed, gently lift the old dome off the skylight frame and set it aside.
  2. Installing the New Dome. Take the new 24 x 24 skylight dome and position it over the skylight frame. Ensure that it aligns properly and fits securely. Refer to the manufacturer’s recommendations for the appropriate attachment method, which might involve using screws, clips, or other fastening mechanisms. Exercise caution while securing the dome in place to avoid over tightening and potentially damaging the new dome.
  3. Proper Sealing and Weatherproofing. Achieving a watertight seal is crucial to prevent any leaks. Apply a layer of waterproof sealant or adhesive around the perimeter of the dome where it meets the skylight frame. This step ensures that no water can penetrate the installation. Additionally, carefully inspect for any gaps or areas that require further weatherproofing, such as the joints between the dome and the frame. Apply weatherproofing tape or sealant as necessary to guarantee a secure and weather-resistant installation.

By following these comprehensive step-by-step instructions, you can successfully replace a skylight or a 24 x 24 skylight dome, allowing you to enjoy ample natural light and maintain an efficiently sealed skylight system. Throughout the process, prioritize safety and seek professional assistance if you encounter any difficulties or uncertainties.

2×2 Skylight Replacement: Step-by-Step Guide

2×2 skylights, like any other type of skylight, can develop certain issues over time. To replace a 2×2 skylight, you can follow this step-by-step guide to ensure a successful installation:

  1. Gather the necessary tools and materials. Before starting the replacement process, make sure you have all the required tools and materials. These may include a ladder, safety goggles, gloves, a pry bar, a utility knife, a measuring tape, flashing, roofing cement, a caulking gun, and the new skylight.
  2. Prepare the work area. Clear the area around the skylight and cover any nearby furniture or flooring to protect them from debris and damage during the replacement process.
  3. Remove the old skylight. Carefully remove the trim and any sealant around the skylight using a pry bar and utility knife. Take note of the flashing and how it was installed for reference during the installation of the new skylight.
  4. Measure and cut the new skylight. Measure the opening left by the old skylight and ensure that the new skylight matches those dimensions. Use a utility knife to cut away any roofing material if necessary to create the appropriate opening for the new skylight.
  5. Install the new skylight. Apply roofing cement around the opening to create a watertight seal. Carefully position the new skylight in place and secure it using screws or other fasteners recommended by the manufacturer.
  6. Flashing and sealing. Install new flashing around the skylight following the manufacturer’s instructions. Apply roofing cement or sealant to ensure a secure and weatherproof installation.
  7. Test for leaks. Once the skylight is installed, hose down the area and check for any signs of water leakage. Make any necessary adjustments or repairs to prevent future issues and ensure a tight seal.
  8. Replace the trim. Install new trim around the skylight to provide a clean and finished appearance.

4×4 Skylight Replacement

A 4×4 skylight, measuring 4 feet by 4 feet (or 48 inches by 48 inches), offers a larger and more expansive view of the sky while allowing an abundance of natural light to enter a space. Commonly utilized in living rooms, kitchens, or larger commercial areas, this size is preferred when greater illumination and a larger opening are desired. Recognizing when it is time to replace your 4×4 skylight is crucial to maintain its functionality and prevent potential issues. Look out for the following signs that indicate the need for a replacement:

Leaks and Water Damage: If you observe water stains, discoloration, or signs of moisture around the skylight, it is likely leaking. This not only poses a risk of further damage to the surrounding area but also compromises the skylight’s integrity.

Skylight after leaking, wood starts to rot, old weathered wooden window

Cracks or Breakage: Inspect the skylight for any cracks, chips, or shattered glass. Damaged skylights not only affect the visual appeal but also present safety hazards and reduce the skylight’s ability to provide proper insulation.

Poor Energy Efficiency: Older skylights may lack adequate insulation, resulting in temperature fluctuations and increased energy consumption. If you notice significant heat transfer or drafts around your skylight, replacing it with a more energy-efficient option can help reduce energy costs.

Step-by-Step Guide to 4×4 Skylight Replacement

To ensure a smooth installation process when replacing a 4×4 skylight, follow these step-by-step instructions:

  1. Gather the necessary tools and materials: Collect a ladder, safety goggles, gloves, a pry bar, a utility knife, a measuring tape, flashing, roofing cement, a caulking gun, and the new skylight.
  2. Prepare the work area: Clear the surrounding space and protect furniture or flooring from potential debris or damage.
  3. Remove the old skylight: Carefully detach the trim and any sealant around the skylight using a pry bar and utility knife. Take note of the existing flashing and its installation method.
  4. Measure and cut the new skylight: Measure the opening left by the old skylight and ensure the new skylight matches those dimensions. If necessary, trim any roofing material to fit the new skylight precisely.
  5. Install the new skylight: Apply roofing cement around the opening to create a watertight seal. Position the new skylight in place and secure it using screws or recommended fasteners from the manufacturer.
  6. Flashing and sealing: Install new flashing around the skylight following the manufacturer’s instructions. Apply roofing cement or sealant to ensure a secure and weatherproof installation.
  7. Test for leaks: Thoroughly examine the skylight installation for any signs of leakage by hosing down the area. Make any necessary adjustments or repairs to prevent future water intrusion.
  8. Replace the trim: Install new trim around the skylight to enhance its appearance and provide a finished look.

By following these steps, you can successfully replace a 4×4 skylight, enhancing natural lighting and maintaining the integrity of your space.

In conclusion, skylight replacement is a valuable investment that can transform your space, enhance natural light, and improve energy efficiency. Whether you’re replacing a standard skylight, a 24 x 24 skylight dome, or specialized sizes like a 2×2 or 4×4 skylight, following the proper steps and considering professional assistance will ensure a successful replacement. By upgrading your skylights, you can enjoy the benefits of a brighter, more energy-efficient space that provides a connection to the outdoors and enhances the overall aesthetic appeal of your home or building. Transform your space with a new skylight, protect your property with a well-maintained roof, and enjoy the benefits of natural light and energy efficiency. Contact Can Roof professionals now and take the first step towards a brighter and more sustainable future for your home.